
FlutterのStatefulWidgetのState値を親Widgetで管理し、子Widgetでもそれを変更できるようにする方法を紹介します。

実装イメージ
以下のようなUIに関して説明していきます。
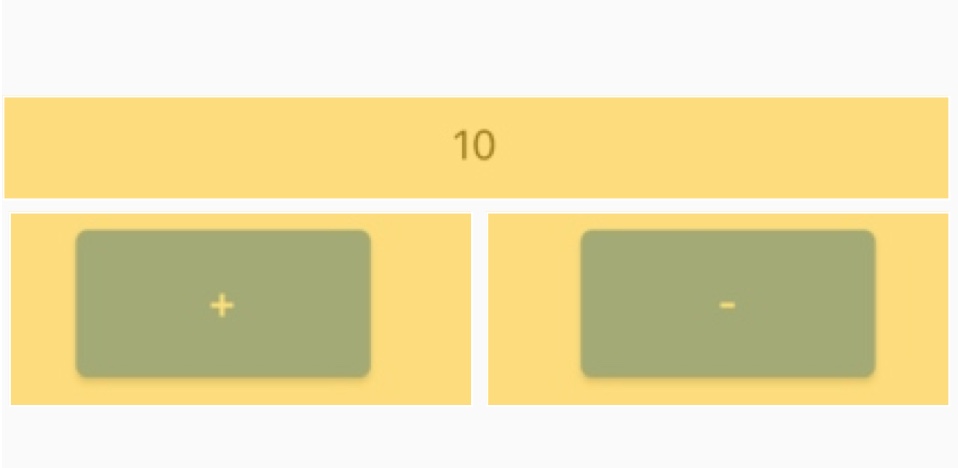
ある表示用の数値に対して、「+」「ー」ボタンをタップすることで数値を+1, -1することのできるアプリがあったとします。
全てのWidgetは一つのファイルに(main.dart)実装することもできますが、
そのボタンは別の画面でも再利用したいと考えた時、同じコードを実装するよりも
このWidgetを切り出して別ウィジェットで実装し、再利用することもできます。
そこで疑問になるのはボタンタップなどのイベント発生時に別ウィジェットへどう伝えるか、
だと思います。
そこで、親ウィジェットのStateを子ウィジェットでも変更できるようにする必要があるのです。
今回は実装方法を2ケースにて実装してみました。
- 単純な親Stateの更新
- 子の保持する値で親Stateを更新
他にもFlutterの記事をあげています!
こちらも良かったら参考にしていただけると嬉しいです。

実装方法
単純な親Stateの更新
以下に実装のソースを記載しています。
「+」「ー」ボタンは別ウィジェットで切り出して実装をしています。
子ウィジェットから親ウィジェットのStateの更新をするポイントは2つです。
それぞれの重要ソースを赤・黄でハイライトしています。
- 親ウィジェットにてStateを更新するメソッドを用意する
- 子ウィジェットの引数にてState更新メソッドを受け取り、イベントにて起動させる
親ウィジェットにてStateを更新するメソッドを用意する
ソースの赤ハイライトにて実装している箇所です。
countをsetStateにて更新するメソッドを用意しておきます。
この際に「+」「ー」ボタンのどちらの動作のメソッドを作成しておきます。
子ウィジェットの引数にてState更新メソッドを受け取り、イベントにて起動させる
ソースの黄ハイライトにて実装している箇所です。
子ウィジェットにて引数を受け取れるように実装し、親ウィジェットのState更新メソッドを
子ウィジェットにて受け取ります。
そのメソッドを変数として保持しておきます。
最後に受け取ったメソッドをボタンタップ時のイベントに実装してあげれば、
期待通りの動作になると思います。
void main() {
  runApp(const MyTodoApp());
}

class MyTodoApp extends StatelessWidget {
  const MyTodoApp({super.key});

  @override
  Widget build(BuildContext context) {
    return MaterialApp(
      title: 'Flutter Demo',
      theme: ThemeData(
        primarySwatch: Colors.blue,
      ),
      home: const CountViewPage(),
    );
  }
}

class CountViewPage extends StatefulWidget {
  const CountViewPage({super.key});

  @override
  State<CountViewPage> createState() => _CountViewPageState();
}

class _CountViewPageState extends State<CountViewPage> {
  // State変数
  int count = 0;

  // State更新メソッド
  void countUp() {
    setState(() {
      count++;
    });
  }

  void countDown() {
    setState(() {
      count--;
    });
  }

  @override
  Widget build(BuildContext context) {
    return Scaffold(
      body: SafeArea(
        child: Column(
          mainAxisAlignment: MainAxisAlignment.start,
          children: [
            Padding(
              padding: const EdgeInsets.all(20.0),
              child: Text(count.toString()),
            ),
            Row(
              mainAxisAlignment: MainAxisAlignment.spaceEvenly,
              children: [
                CountUpButton(
                  notifyParent: countUp,
                ),
                CountDownButton(
                  notifyParent: countDown,
                ),
              ],
            )
          ],
        ),
      ),
    );
  }
}

class CountUpButton extends StatelessWidget {
  final Function() notifyParent;
  const CountUpButton({super.key, required this.notifyParent});

  @override
  Widget build(BuildContext context) {
    return SizedBox(
      width: 100,
      height: 50,
      child: ElevatedButton(
        onPressed: () {
          notifyParent();
        },
        child: Text('+'),
      ),
    );
  }
}

class CountDownButton extends StatelessWidget {
  final Function() notifyParent;
  const CountDownButton({super.key, required this.notifyParent});

  @override
  Widget build(BuildContext context) {
    return SizedBox(
      width: 100,
      height: 50,
      child: ElevatedButton(
        onPressed: () {
          notifyParent();
        },
        child: Text('-'),
      ),
    );
  }
}
子の保持する値で親Stateを更新
以下に実装のソースを記載しています。
CustomRadioButtonというウィジェットを切り出して実装しています。
ラジオボタンにて選択しているIndexの情報はTodoAddPageにてState管理しています。
何故ならTodoをリストに追加する際、入力されたTodoとその達成期間のどちらも渡す必要があるため、上位のウィジェット(TodoAddPage)にて管理しています。
その際に、子ウィジェットであるCustomRadioButtonのいずれかのボタンを選択したときに
親ウィジェットのStateを更新する必要があります。
そのため、子ウィジェットにて保持しているindexの情報を親に渡してあげる必要があります。
実装のポイントは2つです。
それぞれの重要ソースを赤・黄でハイライトしています。
先ほどと要領は同じですが、子ウィジェットにてIndexを渡す必要があります!
- 親ウィジェットにてStateを更新するメソッドを用意する
- 子ウィジェットの引数にてState更新メソッドを受け取り、イベントにて起動させる
親ウィジェットにてStateを更新するメソッドを用意する
ソースの赤ハイライトにて実装している箇所です。
親ウィジェットのStateを更新するためのメソッドをsetSelectedIndexにて定義しています。
この際にStateの更新は引数であるindexにて更新するように実装します。
子ウィジェットの引数にてState更新メソッドを受け取り、イベントにて起動させる
ソースの黄ハイライトにて実装している箇所です。
子ウィジェットにて引数を受け取れるように実装し、親ウィジェットのState更新メソッドを
子ウィジェットにて受け取ります。
そのメソッドを変数として保持しておきます。
最後に受け取ったメソッドをボタンタップ時のイベントに実装してあげ、
タップされたボタンのIndexを引数にて渡してあげると
期待通りの動作になると思います。

import 'package:flutter/material.dart';
import 'package:flutter_application_1/constants.dart';
import 'package:flutter_application_1/todoLIstStore.dart';

class TodoAddPage extends StatefulWidget {
  const TodoAddPage({
    Key? key,
  }) : super(key: key);

  @override
  State<TodoAddPage> createState() => _TodoAddPageState();
}

class _TodoAddPageState extends State<TodoAddPage> {
  final TodoListStore _store = TodoListStore();
  String _text = '';
  int _selectedIndex = Biweekly.thisWeek;  // 定数として0を代入している

  void setSelectedIndex(int index) {
    setState(() {
      _selectedIndex = index;
    });
  }

  @override
  Widget build(BuildContext context) {
    return Scaffold(
      appBar: AppBar(),
      body: Padding(
        padding: const EdgeInsets.all(8.0),
        child: Column(
          children: [
            TextFormField(
              textInputAction: TextInputAction.next,
              onChanged: ((String value) {
                setState(() {
                  _text = value;
                });
              }),
            ),
            CustomRadioButton(
              selectedButton: _selectedIndex,
              notifyParent: setSelectedIndex,
            ),
            SizedBox(
              width: MediaQuery.of(context).size.width / 2,
              child: ElevatedButton(
                child: _text.isEmpty ? Text('Todoを決めましょう') : Text('追加'),
                onPressed: _text.isEmpty
                    ? null
                    : () {
                        _store.updateList(_text, _selectedIndex);
                        Navigator.of(context).pop();
                      },
              ),
            )
          ],
        ),
      ),
    );
  }
}

class CustomRadioButton extends StatefulWidget {
  final int selectedButton;
  final Function(int index) notifyParent;
  const CustomRadioButton({
    Key? key,
    required this.selectedButton,
    required this.notifyParent,
  }) : super(key: key);

  @override
  State<CustomRadioButton> createState() => _CustomRadioButtonState();
}

class _CustomRadioButtonState extends State<CustomRadioButton> {
  List<String> buttonText = ['今 週', '来 週', '2週間後', 'それ以降'];

  Widget button({required String text, required int index}) {
    return InkWell(
      splashColor: Colors.cyanAccent,
      onTap: () {
        widget.notifyParent(index);
      },
      child: Container(
        padding: const EdgeInsets.all(12),
        color: index == widget.selectedButton ? Colors.blue : Colors.white,
        child: Text(
          text,
          style: TextStyle(
            color: index == widget.selectedButton ? Colors.white : Colors.black,
          ),
        ),
      ),
    );
  }

  @override
  Widget build(BuildContext context) {
    return Padding(
      padding: const EdgeInsets.symmetric(vertical: 8.0),
      child: Row(
        mainAxisAlignment: MainAxisAlignment.center,
        children: [
          ...List.generate(
            buttonText.length,
            (index) => button(
              index: index,
              text: buttonText[index],
            ),
          ),
        ],
      ),
    );
  }
}
ボタン部分の実装詳細は以下の記事を参照していただけると幸いです∧( ‘Θ’ )∧


コメント